version 1.0L
fg - May 25, 2001
[1.Introduction] [2.Normal
use] [3.Monitoring loop] [4.Single
event read-out] [5.Switching HV on and
off]
[6.Reloading configuration
files] [7.Understanding the messages]
[8.More diagnostics] [9.File
Formats]
[10.Light vs. expert (full) version]
The tofphv program is used to control and monitor the High Voltage (HV) system of the TOFp in the STAR detector. The HV system for TOFp can be divided into three blocks: the HV cell (HVC) which generates the HV for the photomultiplier tube and is addressable by the HVSys Module. The HVSys Module (HVS) can control and monitor up to 4 branches of 255 HVCs each. Communication with the outside world is provided through a serial interface. The TOFp DAQ pc is connected to the HVS through its serial port.
This users manual focuses on the so-called light version of the control program. In section 10 the light and full versions are compared. The light version is a tailored to initialize and monitor the HVSys under normal conditions. Warnings and errors are still passed to the user but no diagnostics is provided. Section 2 will show how to set-up and monitor a typical TOFp HV session. More details can be found in the next three sessions. Usually a monitoring loop keeps track of the read-back voltages, see section 3. The only and very basic diagnostics tool that comes with the light version is the single event read-out, explained in section 4. Section 5 describes the HV submenu.
The next section describes the File Menu. Usually all the necessary files are automatically loaded and the file menu is not required. Section 7 describes the messages, warnings or errors that might show up. Section 8 describes the event log file which can be analyzed with other tools (not part of this control program). The next section describes the different files which are created or required in a typical tofphv session. Finally section 10 will briefly compare the light version to the full version.
Under normal running conditions the HV is already switched on and tofphv is only used for monitoring purposes. Starting the program will typically result in these messages:

The program reads in default configuration, data and pedestal files and polls the HVS in order to find out the status of the HV switches. In this typical example tofphv found the system to be switched on (recoverStatus : status HV switches 1 0 0 0) and it was able to read back all 41 cells. The program is now ready to be used in basically three different ways: to monitor the system, take single-event snapshots or to switch the HV on/off (part of the HV Menu). Besides these three modes, the File Menu allows you to (re-)load new or default settings. Normal use means that you don't need these submenu's at all. Monitoring the system and occasionally switching the HV on/off is considered normal use.
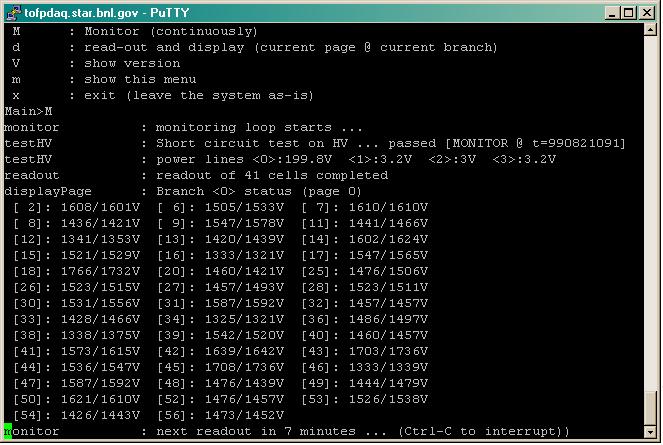
The monitoring loop will read-out the system every 60 minutes (i.e. the value used in the hvsystem.cfg configuration file). The program will tell you when the next read-out will be. To start the monitoring loop press M while in the Main Menu; tofphv will perform a read-out and will wait for 60 minutes until the next read-out.
Each monitor event consist of three actions: (1) test the status and read-back the high voltage on the branches, (2) read-back the 41 HVCs and compare them to the set-values and (3) store this event in the event log file for future analysis. The reference to this particular event is give by the event timestamp t (which is in this example 990821091). This timestamp can be traced back in the event log file only if the HV was actually switched on.
The monitoring loop can be interrupted using Ctrl-C, however, this will stop tofphv to. This is not a big deal since tofphv will read back the HVS status every time it starts. Do not interrupt the program once only one minute is left, this might corrupt the event log file or worse leave the HVS in an undefined state.
Unfortunately some instabilities on the readout bus will occasionally give errors and exclamation marks. If this happens to often for a particular cell contact the TOFp Detector Expert.
Apart from exclamation marks the system may also return question marks. These indicate repetitive overflows while reading back. In case of an overflow that particular cell is polled a number of times until the overflow disappears. Once the maximum number of retries (see the hvsystem.cfg configuration file) is reached, the system fails and shows the question mark.
For more information on the displayed values, see the next section.
The Main Menu allows for single event read-outs by pressing d. This tool is only for quick diagnose after e.g. reloading certain configuration files. Its output is exactly the same as for the monitoring loop except that the user regains control over tofphv now. If the high voltage on the branches is switched on an event will be written to the event log. In no way usage of this read-out and display option should affect the set voltages except that interruption of the program while reading may leave HVS in an undefined state. This should definitely be avoided.
All the cells that exist (i.e. set by the data file) are present in the list of cells that is shown after a display event. The way the cells are displayed indicates not only its values but also whether the cell is active or has errors:
[ 2]: 1608/1601V
The square brackets [ ] tell you that this particular cell is active (which means it exists and is switched on). If the cell is not switched on the square brackets will change into round brackets ( ). The first value displayed (1608V) is the pedestal corrected read-back value. The voltage after the slash (1601V) indicates the set-value. These values should agree within some 30V or so. Most importantly they should be stable. An exclamation mark ! appears once these values are more than 50V apart (see the hvsystem.cfg configuration file). If this exclamation mark does not disappear after a couple of read-outs the TOFp Detector Expert should be noticed. The question mark ? appears when a particular cell gives an overflow. Usually these overflows are not related to that cell but to the HVSys bus.
If asked for by the shift leader or TOFp detector expert, the detector operator on duty can switch the HV on branch 0 on or off. From the Main Menu of tofphv select the submenu HV Menu by pressing H. This submenu only allows branch 0 to be switched and the HV on all branches to be tested. If asked to select s to switch on or off branch 0. As a reminder tofphv shows the current switch status on all branches. Use 1 to switch on or 0 to switch off. After this you can check the voltages by pressing t. Use x to exit the HV Menu and return to the Main Menu.
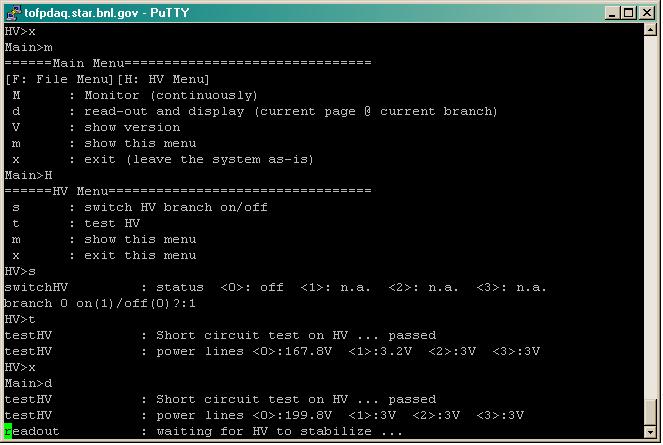
It can happen that after switching the HV the next read-out (from the Main Menu) will wait for HV to stabilize (like in the example above). The program allows for a 10 sec pause to allow the HV to reach its stable value. This value is hard coded and can not be changed. The rule of thumb should be to give the HV even more time to settle like ~30sec.
The control program depends on a number of configuration files. Default files are loaded each time tofphv starts. In case one of these files can not be located at start-up tofphv will notify the user. These are the default files that are required to run the TOFp HV system:
The File Menu allows to reload these files by selecting F from the Main Menu:
 ======Main Menu===============================
 [F: File Menu][H: HV Menu]
  M      : Monitor (continuously)
  d      : read-out and display (current page @ current branch)
  V      : show version
  m      : show this menu
  x      : exit (leave the system as-is)
 Main>F
 ======File Menu===============================
  c      : (re-)read configuration file
  d      : read data file (a read stores data in HVS)
  p      : read pedestal file
  m      : show this menu
  x      : exit this menu
Option c only allows the default configuration file (hvsystem.cfg) to be reloaded. This should only be done when asked for by a TOFp detector expert. Loading a wrong or corrupted configuration file might damage the TOFp detector. The option to load a data file -d- allows the user to enter a filename different from the default (hvsystem.dat). Like the configuration file make sure these files are not corrupted and only load when asked to do so by a TOFp detector expert. Loading a wrong or corrupted data file might damage the TOFp detector.
The pedestal file can be reread with option p. Loading a wrong or outdated pedestal file does not critically affect tofphv: you will only get wrongly corrected read-back values. The events stored in the event-log file do not depend on any pedestal correction.
In case a file is not found tofphv will print a warning and return to the File Menu.
Note that the settings in the re-loaded files are immediately activated, e.g. loading a new data file will automatically download these new values in the HVSys module.
Most warnings or errors typically occur when tofphv starts up: the serial communication is set-up, the default input files are read-in, the integrity of the branch HV is checked and a first read-out (without displaying the results) is performed. In this section common problems and their error messages are reviewed. Each software routine that produces a message identifies itself first which makes tracing the problem easier. A number of command-line switches allow certain routines to be skipped at start-up.
Initialization of the serial port. The program assumes the serial port to be /dev/ttyS0. If tofphv cannot open this port it will produce this error message
ERROR : failed to initialize serial port
Use the -d option to change the device name from its default. The other two error messages that might occur during the initialization phase are related to Linux and indicate insufficient user privileges or ill configured serial ports:
initSerialCom    : unable to get port settings -
initSerialCom    : unable to set port settings -
In either cases tofphv will terminate.
After the serial communication is set-up tofphv will read the default configuration files. Except for the configuration file (hvsystem.cfg) being able to open these files is not critical at this point. Later on in the program the data and pedestal files can be opened manually (see File Menu). If tofphv can not find hvsystem.cfg in its current working directory it will report
ERROR : failed to open HV status
and exit. The other two files produce messages like this:
readDataFile     : Warning, file hvsystem.dat not found
WARNING          : no default HV data file found.
or
readPedestalFile : error opening file hvsys.ped
WARNING          : no default pedestal data found.
Both messages are not critical and the program will continue but no HVCs are configured and a read-out will typically yield zero cells. The commandline option -nc skips reading in the default files (including hvsystem.cfg).
After the initialization phase the program tries to recover previous settings of the HV switches from the HVS. This is typically the place where it communications with the HVS for the first time and where (in case the HVS is switched off or otherwise defect) the program will stop without a warning. If the program does not return with a summary of the HV switched after the message
* polling HV switch status
stop the program and check whether the HVS module has the net power switched on The next step before tofphv becomes interactive is a first read-out of all the configured cells. If no hvsystem.dat was found readout will report that no cells have been read-out. Make sure that for the TOFp configuration 41 cells are read-out. With the commandline option -nr the initial read-out phase can be skipped.
Critical errors with the HV branch switches are always followed by an automatic power down on those branches. Before every read-out (during the monitoring phase) a short-circuit test on the branches is performed. If the software status does not correspond to the readback status from the HVS that particular branch is switched off and one of these messages is displayed:
testHV           : branch 0 HV short circuit protection warning
testHV           : branch 1 HV short circuit protection warning
testHV           : branch 2 HV short circuit protection warning
testHV           : branch 3 HV short circuit protection warning
At this point the HV is switched off (which can be checked with the test option in the HV menu). Contact the TOFp Detector Expert for further instructions.
The core communication modules in tofphv can produce messages such as:
sch              : ERROR sending character -
rch              : ERROR receiving character -
Contact the TOFp Detector Expert in case such errors occur.
The event log file hsys.evt is updated for every read-out, calibration or pedestal event. Since latter two events are only part of the expert version of tofphv only readout events are appended to the event logfile. Every time a read-out is performed (e.g. every 60 minutes during the monitoring loop) all cells from the active branch and a timestamp are stored. Here active branch means that the high voltage on that particular branch is switched on. Offline software is used to parse and analyze this data. Detector operators should make sure that the hvsys.evt file is not erased or removed.
The default (i.e. light) version of tofphv needs three input files and appends or recreates on output file. All files have an ASCII format. The order of the numbers in the configuration file is fixed. The comment lines tell you what those numbers or typically for:
1  0  0  0   //scanbr0-3
1150  2300   //minval maxval
50    //maxdelta - max allowable difference (in V) between "v" and "rdout"
3     // number of retries in case of bus timeouts.
120   //utoffmax
2.64  //Kr - float
200   //del in ms
20    //testlen  - delay before readout in sec during test
10    //tsthvperiod  - in sec
0     //fixedutoff-common pedestal for all cells; 0-means use of real pedestals
0     //convert set values from Voltages to ivals
60    //interval in minutes between subsequent monitor readouts
These values should not be changed.
The data file hvsystem.dat contains a list of all the existing cells with their set values, active default and backup pedestal values. Although this file can be edited it is usually (re-)generated by the full expert version of tofphv. The first line is always expected to be the comment line:
branch  Cell_No   Volt       iVal    On/Off Offset
0          2      1601       100       1      91
0          6      1533        85       1      93
0          7      1610       102       1      90
0          8      1421        60       1      88
The cell numbers refer to the HVC-ID of a cell in that particular branch. Depending on the "convert set values from Voltages to ival" setting in the configuration file tofphv used either the Volt column or the iVal column for the set-values. The On/Off column should be 1s (i.e. on) only. Finally the last column shows backup values for the pedestals. These are usually overwritten when the pedestal file is read in next. The data file for TOFp should have 41 entries all on branch 0.
Like the data file the pedestal file is created by the full expert version of tofphv. It contains the pedestal values for all the cells on all four branches. A timestamp, the number of branches and cells per branch are the first three numbers followed by one line of pedestal values per branch:
990736779  4 256
    0   91    0    0    0   93   90  [...]
    0    0    0    0    0    0    0  [...]
    0    0    0    0    0    0    0  [...]
    0    0    0    0    0    0    0  [...]
Finally the event log file has one line per event. The first character of each line indicates what type of event is stored: calibration (C), pedestal (P) or readback (R) events. The next number is the event timestamp. For readback and pedestal events the next number is not used and typically reads -1. For calibration events it is the branch wide set-value. The next values are the branch number (typically 0) followed by all the read-back values for all HVCs for that particular branch. In case multiple branches are activated each branch has its own entry in the event log file.
R 990550326    -1  0    0  699    0    0    0 1019  700 [...]
R 990550882    -1  0    0  699    0    0    0  664  700 [...]
The full expert version of tofphv has more diagnostics and configuration options. It can scan all active branches for (new) cells. Perform calibration and pedestal events, (re-)set the set-values on each of the existing cells. Read back the set-values from the HVS module and store them. Use the V option from Main Menu to find out what version is running. An L after the version number indicates the light version, otherwise the full version is running. Detector operators should run the light version.